The buying process for cPanel web hosting is pretty straightforward at DotsDen and gives users a user-friendly Linux-based control panel for managing websites. DotsDen provides a wide range of hosting options targeted towards the different needs of both beginners and advanced users. This knowledge base will walk you through the steps involved in buying cPanel web hosting at DotsDen and will outline the key features and options to help you choose the best plan for your online presence.
Understanding DotsDen's cPanel Hosting Packages
When selecting a hosting provider, it's crucial to understand the range of features each package offers. DotsDen's hosting packages boast shared hosting, VPS hosting, and a dedicated server. Each of the plans offers different degrees of server management and access, hence making it one of the user's favourite choices due to its flexibility and scalability.
- Shared Hosting: It is recommended for use on small websites and blogs. Shared hosting enables the inclusion of unlimited FTP users, addon domains, and email services as a way to get started economically.
- VPS Hosting: For those needing more control, VPS hosting offers a private server environment with root user access, allowing for advanced development tasks and custom configurations.
- Dedicated Servers: This is perfect for heavy lifting, where raw power and businesses that require dedicated resources are at their very core. Have complete control, the most advanced level of security features, and automated snapshots for ultimate peace of mind.
Step-by-Step Guide to Purchase cPanel Web Hosting from DotsDen
To purchase a cPanel hosting solution from DotsDen, follow these simple steps:
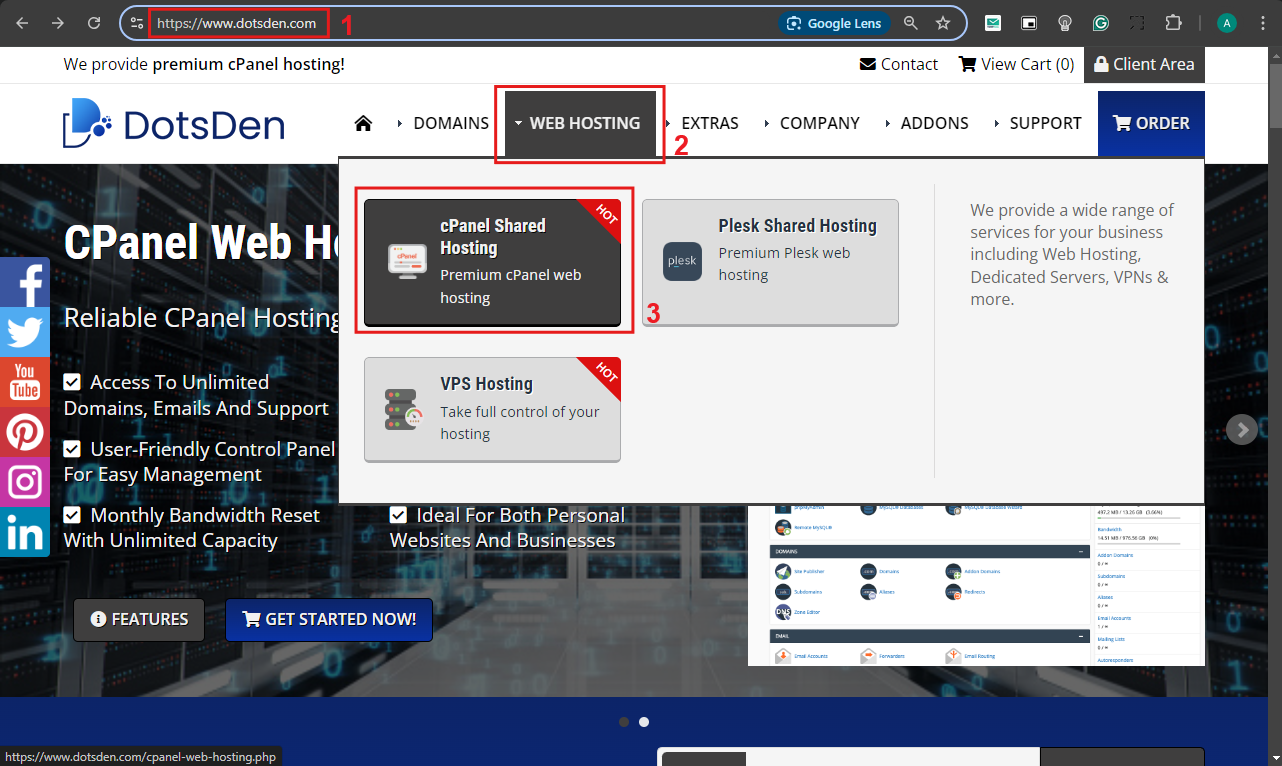
1. Visit the DotsDen Website: Navigate to the DotsDen homepage and select the Hosting menu. Choose cPanel Web Hosting from the available options.
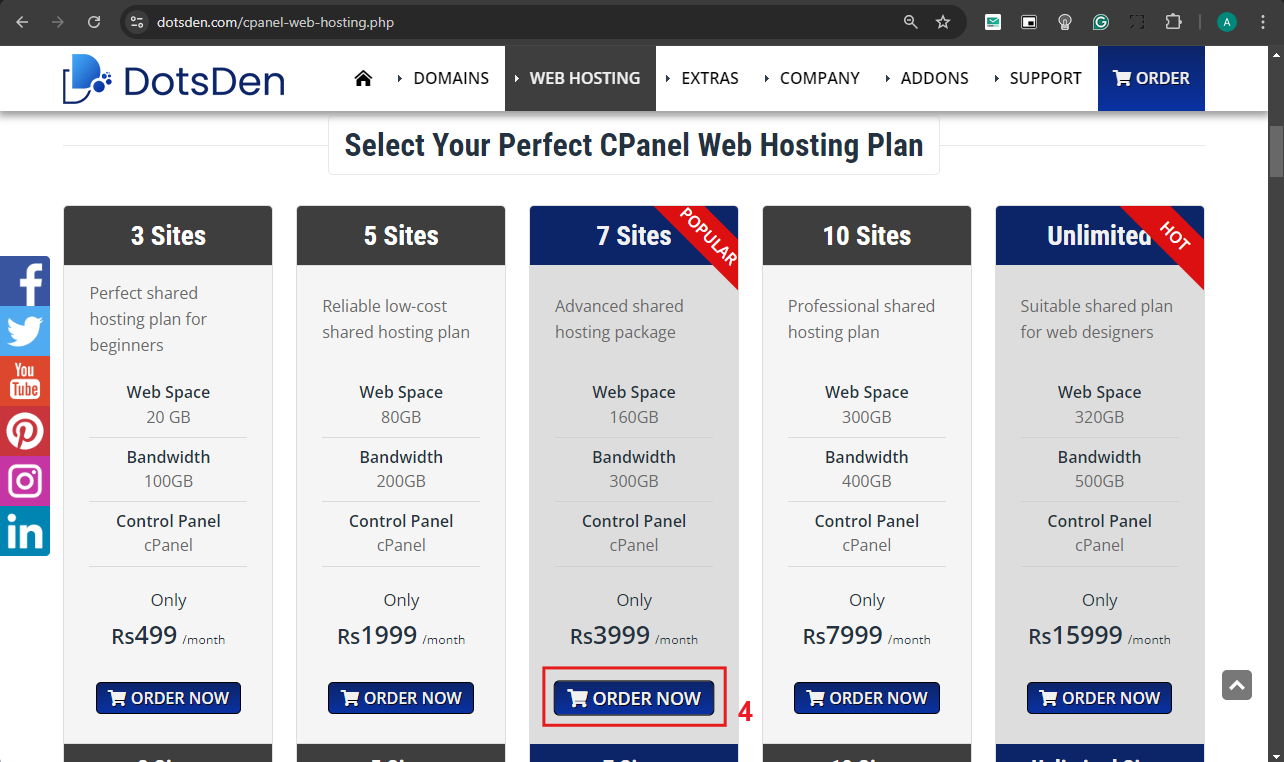
2. Select a Hosting Plan: Browse through the different hosting plans. Each plan offers different disk space, email inboxes, and management platform features. Pick a plan that fits your requirements, considering factors like bandwidth, automation tools, and additional security features.
3. Choose a Domain: If you don't have a domain, DotsDen provides the option to purchase one with domain credit. You can also use an existing domain by selecting the domain management option during the checkout process.
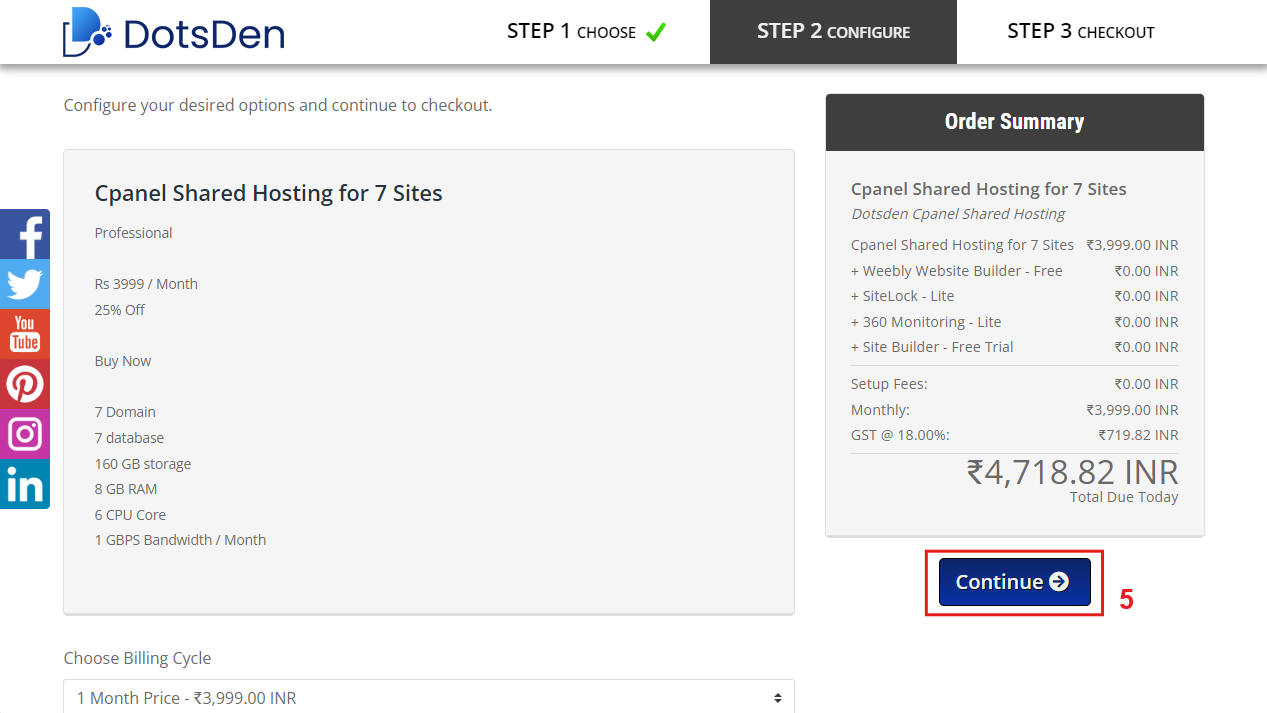
4. Configure Your Hosting Plan: Configure your hosting plan according to your needs. You can add features like additional disk space, SSL certificates, and CDN (Content Delivery Network) for better performance and security.
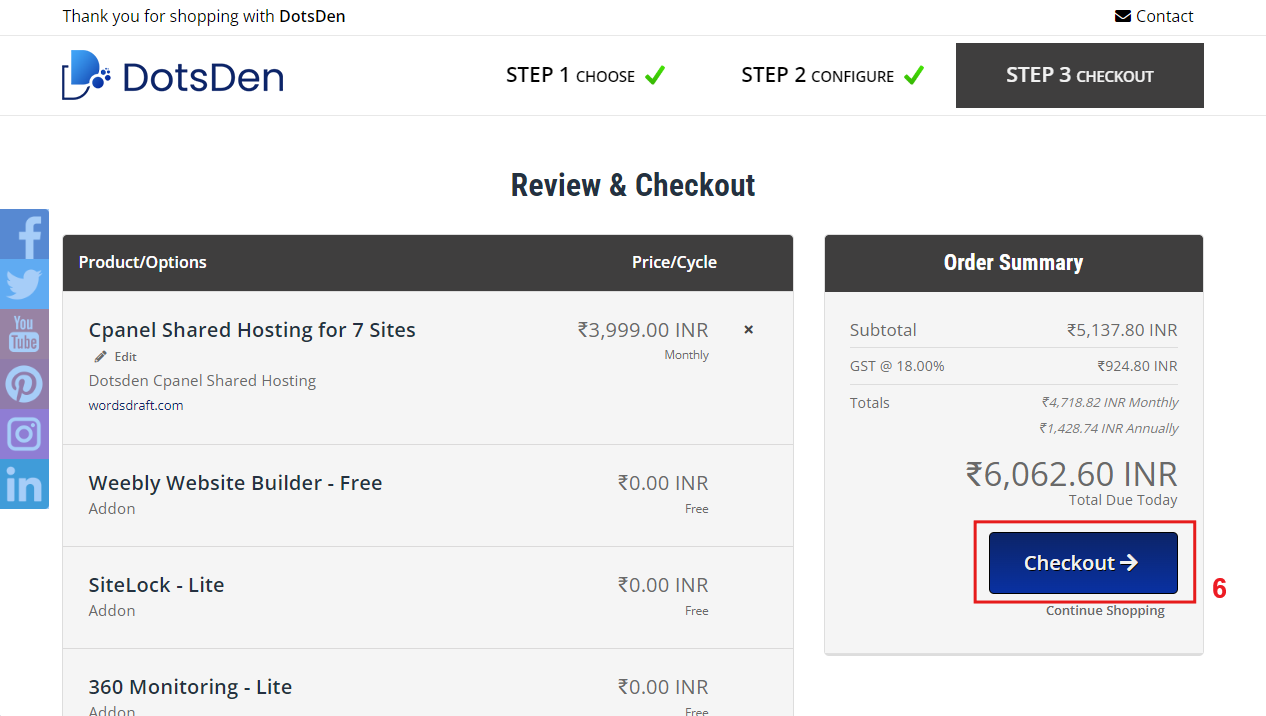
5. Complete the Purchase: After selecting your cPanel web hosting plan, complete the checkout process, which is organized into the following sections:
5.1 Sign Up or Log In: New users can sign up with personal details or Google while existing users can log in.
5.2 Personal Information: Enter your First Name, Last Name, Email, and Phone Number to ensure you receive important updates and support.
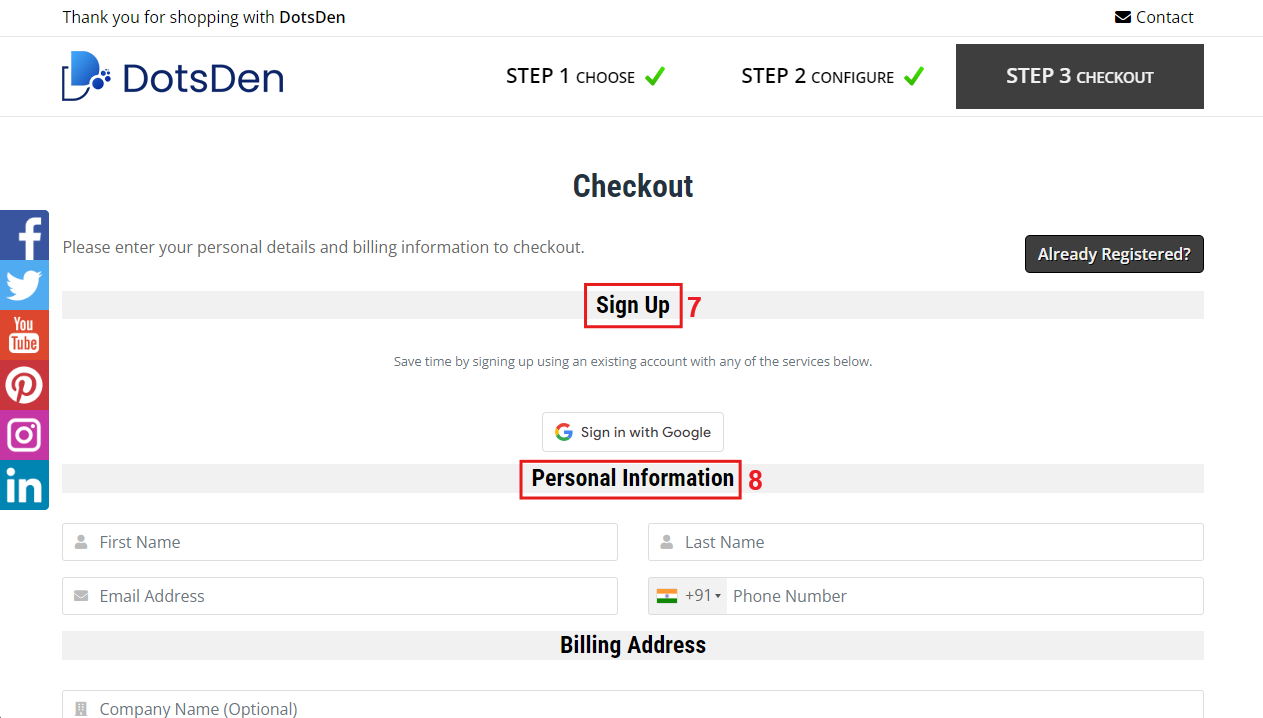
5.3 Billing Address: Provide your billing address, including optional details like company name, Tax ID, and GSTIN.
5.4 Additional Information: Fill in any required fields marked with an asterisk (*).
5.5 Domain Registrant Information: If purchasing a domain, input the necessary contact details for registration.
5.6 Account Security: Create a strong password combining letters, numbers, and special characters to secure your DotsDen account.
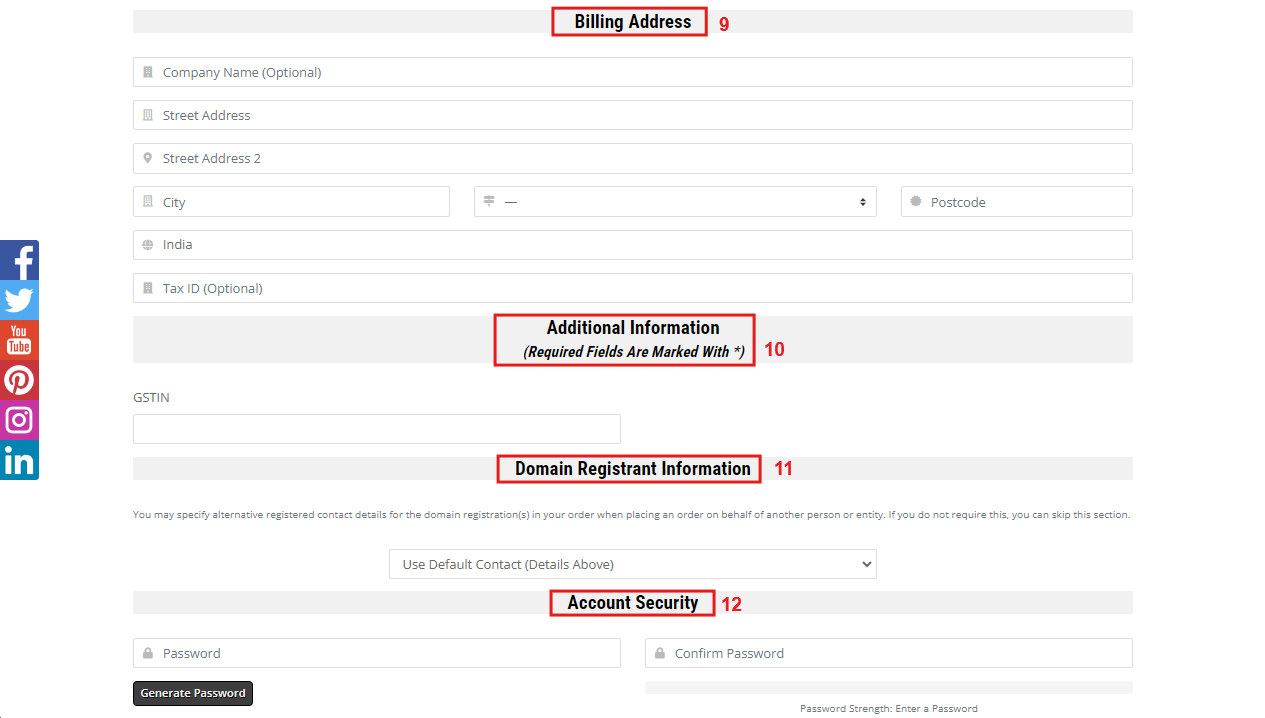
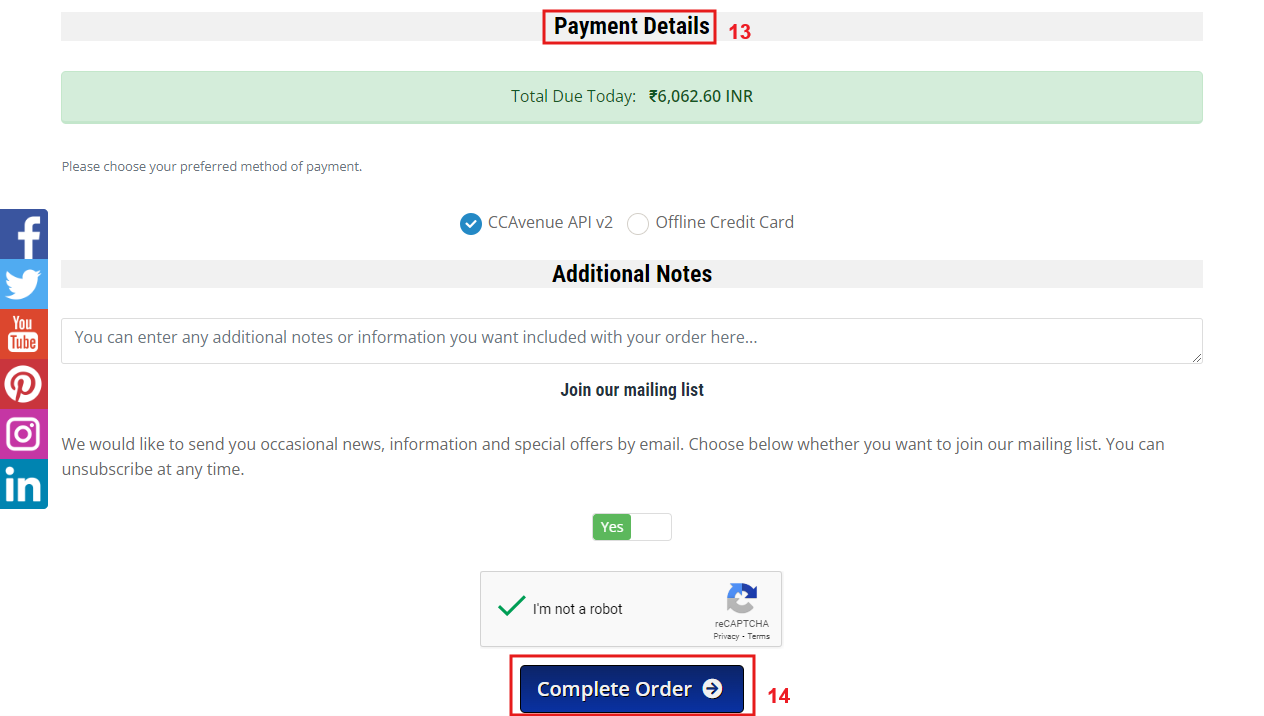
5.7 Payment Details: Review your total amount due and choose a payment method (e.g., CCAvenue API v2 or Offline Credit Card).
5.8 Complete Order: Enter any additional notes, join the mailing list if desired, complete the CAPTCHA, and click "Complete Order" to finalize your purchase.
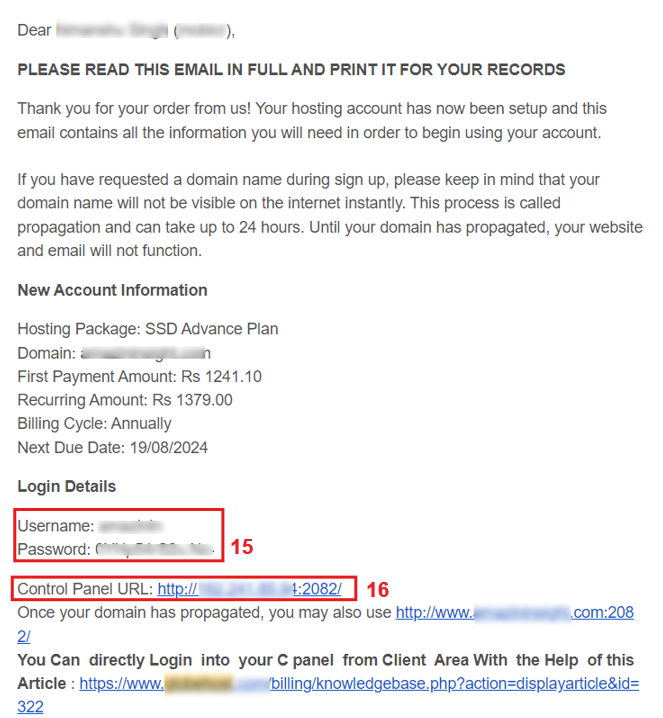
6. Set Up Your cPanel: Once the purchase is complete, you will receive an email with your cPanel login details. Use the graphical user interface to manage your website files, email services, and advanced tools like the Database Wizard and 1-click application installation.
Key Features of DotsDen's cPanel Hosting
- User-Friendly Control Panel: A graphical user interface enables users to manage hosting accounts and websites easily.
- Security Features: Includes advanced security features, such as application firewall and auto-software updates that keep your site safe.
- Scalable Solutions: From personal web pages to large corporate websites, it offers scalable hosting solutions, complete with load balancing and backup utilities.
Benefits of Choosing DotsDen for Your Hosting Needs
By working with DotsDen, you will collaborate with a trustworthy host serving millions of customers globally. DotsDen focuses on reliability and customer satisfaction, offering comprehensive support and numerous features to help grow your online presence.
Why Choose DotsDen for Your Hosting Needs?
DotsDen is unmatched in this web hosting industry for its strong management platform, ensuring customer satisfaction. The rich Linux-based control panel is packed with advanced tools to manage your website efficiently. DotsDen also supports business websites very well in terms of business identity verification and certificates of business identity.
The graphical interface of this platform is well-designed; therefore, the process of working with this platform becomes quite simple for the users as they can conduct their tasks easily, starting from domain management to file management. Apart from that, DotsDen also covers a wide range of tools and features, making it a preferred choice for hosting solutions.
For further inquiries, please contact the cPanel Customer Support team at DotsDen.

